The best donut you ever eat is the one you eat just a few minutes after it comes out of the fryer. The best way to make that happen is to make them yourself!
More About This Recipe
-
There comes a point in most people's lives where they finally have to come to terms with the fact that they simply aren't good at something they wish they were good at. For me, that thing was art. As a kid I always thought it'd be cool to be able to draw cartoons and paint vast beautiful landscapes.
But guess what? I'm just plain not good at drawing. Or painting. Or really anything visually artistic at all.
The good news though is that I eventually did find something I'm good at: making donuts. So for my first post here at Tablespoon, I figured I would try to meld something I'm pretty good at (donuts) with something I wish I were good at (art).
Most people think it's an absolutely insane idea to make donuts at home, but there are two reasons why you should try it. First, they aren't as hard as you might think. Second, and more importantly, the best way to eat a donut is about two minutes after it comes out of the fryer. This is pretty much impossible unless you make them yourself!
Rainbow Donuts Recipe
If you've ever made any dough before, you can make this dough. It's about as easy as it gets. Donut dough falls under the larger family of enriched doughs, which means that besides yeast and flour it has eggs, sugar, and butter in it. This makes it really easy to work with. It also makes it really delicious.
Once you mix all the ingredients together and let the dough rise, just roll out the dough and use some round cutters to cut out the donuts!
Since donuts float, you don't actually need that much oil to fry these guys. If you have a standard sized pan (I used a 15 inch cast iron skillet), you can get away with about a quart of oil. Fry the donuts for 60-90 seconds on each side at 350 degrees.
I definitely recommend using a candy thermometer to make sure you get the temperature right.
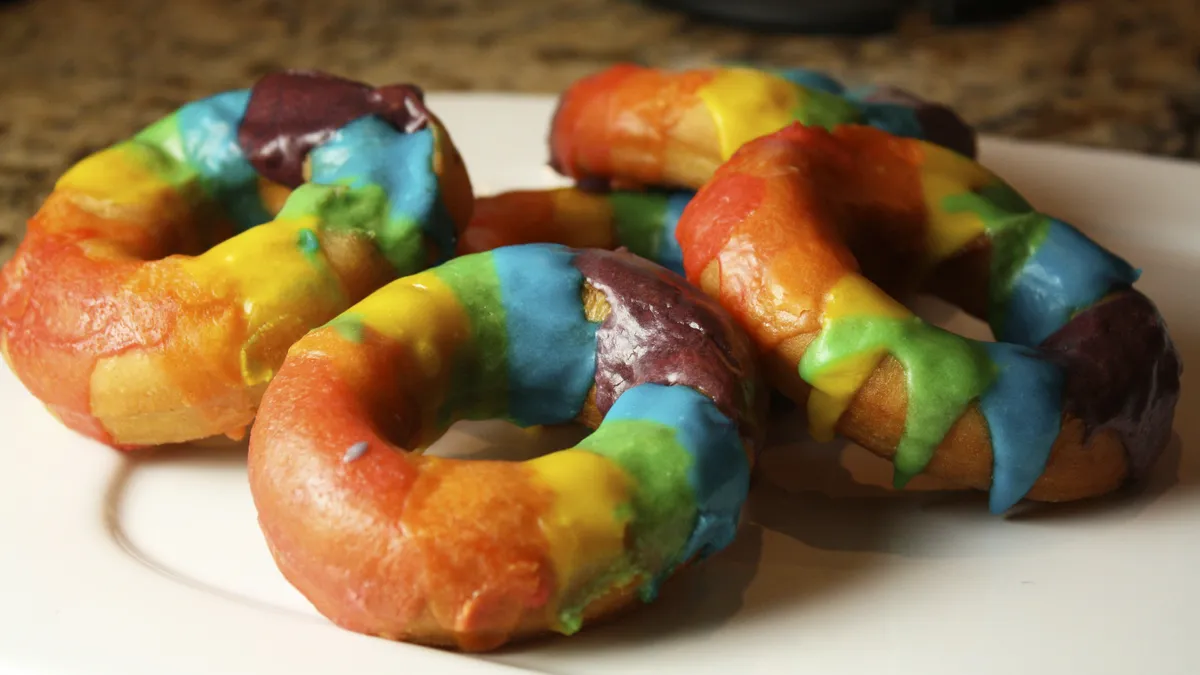
I used Betty Crocker Gel Food Coloring to make my glaze different colors. The glaze itself is pretty easy to whip up (see the full recipe for instructions), then just divide it into six parts and make each color of the rainbow. The only two colors that you'll have to mix are orange and purple.
While technically there are seven colors in the rainbow, it's pretty hard to tell the difference between indigo and violet for our purposes so just make it easy on yourself and go with six.
For the two you will have to blend, orange is a mixture of red and yellow. It's more yellow than red. For purple, it's about 50% red and 50% blue. You can play around with it though to find the right combos.
As my donuts cooled on a wire rack, I started painting on my glazes. I'm sure an artist could do a better job of getting even color distributions, but I did my best!
Ok. I'll admit. This does take some time. If you're short on it, you can definitely just glaze the donuts without the rainbow and they will taste the exact same. If you have kids or something though, donut painting would be a fantastic way to spend an afternoon. Just maybe don't let them fry their own!
Of course, if you've gone through the trouble of making the dough and setting up a frying station, you might as well fry a whole bunch of holes! You can re-roll your dough and cut out as many holes as you want. Fry them up and toss them in some cinnamon-sugar!
So, while my donuts may not be as perfectly rainbowed as they could be, I was pretty happy with them.
And they tasted really good!
As luck would have it though, I did manage to create some art during all of this. After I lifted up my wire rack that all the donuts were sitting on, I realized that I had made some modern art during my donut glazing!
Hmmm... maybe my art dreams are alive after all!
OK. Probably not. But at least I can eat homemade donuts all day to soothe the pain.
Nick watched the Double Rainbow Video 42 times this week while he blogged at Macheesmo. Check out his Tablespoon profile to find out more about him!
Rainbow Donuts
- Prep Time 45 min
- Total 4 hr 0 min
- Servings 12
- Ingredients 17
Ingredients
- 2 1/2 teaspoons active dry yeast (1 package)
- 2 tablespoons warm water (105–115°F)
- 1 cup milk, room temperature
- 1/4 cup unsalted butter, melted
- 3 large egg yolks
- 2 tablespoons sugar
- 1 1/2 teaspoons salt
- 1/2 teaspoon cinnamon
- 3 1/4 cups all-purpose flour plus some for working the dough
- 1 canola oil (48 oz) or other neutral oil for frying
- 1/4 cups cinnamon sugar (4 parts sugar - 1 part cinnamon) This is optional
- 1/2 cup unsalted butter (for glaze)
- 1/4 cup milk (for glaze)
- 1 tablespoon light corn syrup (for glaze)
- 2 teaspoons vanilla extract (for glaze)
- 2 cups powdered sugar (you may need up to 3 cups)
- 1 package Betty Crocker™ blue, red, green and yellow gel food colors
Instructions
-
Step1Add warm milk and water to a mixing bowl with dry yeast. Let sit for 5 minutes. If yeast bubbles, you are ready to go. If it doesn't, you need new yeast!
-
Step2In stand mixer, attach dough hook. On low, add butter, egg yolks, sugar, salt, and cinnamon to liquid. Finally, add flour in 3 batches. Mix on low until dough forms a tight ball. If the dough is sticking to the side of the bowl, add more flour by the tablespoon. NOTE: You don't need a mixer to make these, you can also mix the ingredients in a large bowl with a wooden spoon and then knead lightly on floured surface for a few minutes until dough is soft, but not sticky.
-
Step3When dough is mixed well, lightly oil a large bowl and add dough. Cover and let rise for 2 hours at room temperature. It should at least double in size.
-
Step4When dough has risen, turn out onto lightly floured surface and roll out dough until it's 1/4 inch thick. Use circular cutters to cut out donut shapes. If you have a tiny cutter, you can cut out the holes for the donuts, but you can also just leave them whole.
-
Step5Meanwhile, pour neutral oil in a heavy pan (cast iron or dutch oven) until the oil comes about 1.5-2 inches up the pan. That's all you need to fry these since the donuts float. Heat the oil until it reaches 350°F. Use a candy/deep-fry thermometer to ensure safe temperatures.
-
Step6Once oil is hot, add donuts and cook for 60-90 seconds on each side until lightly browned. You will probably have to work in batches.
-
Step7Remove donuts once they are done on each side and let cool on drying rack.
-
Step8Apply glaze to the donuts!
-
Step9For glaze, melt butter in a bowl and whisk in corn syrup and milk until it's well dissolved. Add vanilla extract. Sift in powdered sugar until glaze is thick but still liquid.
-
Step10If you're coloring your glazes, add a few drops of food coloring until you get the desired colors. NOTE: If you let the glaze sit for a few minutes, it will start to harden (that's what glazes do). To bring it back to life, just stir in a few drops of warm water.
Nutrition
No nutrition information available for this recipe
(function() {
document.addEventListener('DOMContentLoaded', function() {
var componentMetadata = JSON.parse('\x7b\x22componentName\x22\x3a\x22RelatedContent_86838426-dd26-481a-9735-69435bca607d\x22,\x22deferOptions\x22\x3a\x7b\x22deferComponent\x22\x3afalse,\x22deferType\x22\x3a\x22None\x22,\x22deferId\x22\x3a\x22rbd348aa80e7543f4bccc178f98a49a4a\x22,\x22deferredContainerId\x22\x3a\x22\x2fmain\x2frdpRelatedContent1_NonDeferred\x22,\x22deferredContainerView\x22\x3anull\x7d,\x22viewName\x22\x3a\x22RelatedContent\x22\x7d');
var configuration = {"dataSourceId":"86838426-dd26-481a-9735-69435bca607d","isCurrentUserAnonymous":true,"isAnonymousUserWithFavorites":false,"relatedContentList":{"contentId":"f300897e-8ab9-4c33-9b07-f005d8bf988d","listSettings":{"pageSize":3,"startPage":1,"listType":1,"title":"Try These Next","useModalRegistration":false,"regAction":"","esrcCode":0,"favoriteButtonLabelFormat":"Add {0} to favorites","contentTypes":["Category"],"showImages":false,"imageSize":0,"showRatings":false,"allowFavoriting":false,"cssClassName":"relatedContentWithoutImages","favoriteButtonText":""},"items":[{"contentId":"c2763a40-34f9-4e58-ab97-84f24640e5ca","contentType":"Category","title":"Breakfast Pastries","isFavorite":false,"linkUrl":"/courses/breakfast-and-brunch/breakfast-pastry","numberOfRatings":"0","averageRating":"0","averageRatingStars":"0","smallImageUrl":"/-/media/GMI/Core-Sites/TBSP/Images/Articles/Images-for-Posts-PrePandoNext/2014/05/week3/2014-05-12-donuts-hero-680x384.jpg?W=276","mediumImageUrl":"/-/media/GMI/Core-Sites/TBSP/Images/Articles/Images-for-Posts-PrePandoNext/2014/05/week3/2014-05-12-donuts-hero-680x384.jpg?W=680"},{"contentId":"afc970f5-8b27-44b0-91cd-c8845febfd72","contentType":"Category","title":"Rainbow Cake","isFavorite":false,"linkUrl":"/courses/dessert/cake/rainbow-cake","numberOfRatings":"0","averageRating":"0","averageRatingStars":"0","smallImageUrl":"","mediumImageUrl":""},{"contentId":"dd9b8702-6d03-4958-b302-2fd3be29a6d5","contentType":"Category","title":"Puff Pastry","isFavorite":false,"linkUrl":"/courses/dessert/pastry/puff-pastry","numberOfRatings":"0","averageRating":"0","averageRatingStars":"0","smallImageUrl":"","mediumImageUrl":""}],"availableItems":[{"contentId":"c2763a40-34f9-4e58-ab97-84f24640e5ca","contentType":"Category","title":"Breakfast Pastries","isFavorite":false,"linkUrl":"/courses/breakfast-and-brunch/breakfast-pastry","numberOfRatings":"0","averageRating":"0","averageRatingStars":"0","smallImageUrl":"/-/media/GMI/Core-Sites/TBSP/Images/Articles/Images-for-Posts-PrePandoNext/2014/05/week3/2014-05-12-donuts-hero-680x384.jpg?W=276","mediumImageUrl":"/-/media/GMI/Core-Sites/TBSP/Images/Articles/Images-for-Posts-PrePandoNext/2014/05/week3/2014-05-12-donuts-hero-680x384.jpg?W=680"},{"contentId":"afc970f5-8b27-44b0-91cd-c8845febfd72","contentType":"Category","title":"Rainbow Cake","isFavorite":false,"linkUrl":"/courses/dessert/cake/rainbow-cake","numberOfRatings":"0","averageRating":"0","averageRatingStars":"0","smallImageUrl":"","mediumImageUrl":""},{"contentId":"dd9b8702-6d03-4958-b302-2fd3be29a6d5","contentType":"Category","title":"Puff Pastry","isFavorite":false,"linkUrl":"/courses/dessert/pastry/puff-pastry","numberOfRatings":"0","averageRating":"0","averageRatingStars":"0","smallImageUrl":"","mediumImageUrl":""}]}};
var moduleName = 'relatedContent';
var isVueModule = true;
GeneralMills.PandoSites.RegisterControlInstance(moduleName, configuration, componentMetadata, isVueModule)
});
})();
(function() {
document.addEventListener('DOMContentLoaded', function() {
var componentMetadata = JSON.parse('\x7b\x22componentName\x22\x3a\x22RelatedContent_9930dad2-817c-4363-b508-21f459b3c521\x22,\x22deferOptions\x22\x3a\x7b\x22deferComponent\x22\x3atrue,\x22deferType\x22\x3a\x22OnDemand\x22,\x22deferId\x22\x3a\x22rd936647e569249fb8f1c55ceb3cad46e\x22,\x22deferredContainerId\x22\x3a\x22\x2fmain\x2frdpRelatedContent1\x22,\x22deferredContainerView\x22\x3a\x22RecipeDetailRedesign\x22\x7d,\x22viewName\x22\x3a\x22RelatedContent\x22\x7d');
var configuration = {"dataSourceId":"9930dad2-817c-4363-b508-21f459b3c521","isCurrentUserAnonymous":true,"isAnonymousUserWithFavorites":false,"relatedContentList":{"contentId":"f300897e-8ab9-4c33-9b07-f005d8bf988d","listSettings":{"pageSize":6,"startPage":1,"listType":1,"title":"","useModalRegistration":false,"regAction":"","esrcCode":0,"favoriteButtonLabelFormat":"Add {0} to favorites","contentTypes":[],"showImages":true,"imageSize":1,"showRatings":false,"allowFavoriting":true,"cssClassName":"","favoriteButtonText":"Save"},"items":[{"contentId":"6995da8c-c7f1-4f5f-a85c-be5b6c69db74","contentType":"Recipe","title":"Maple Bacon Donuts","isFavorite":false,"linkUrl":"/recipes/maple-bacon-donuts/6995da8c-c7f1-4f5f-a85c-be5b6c69db74","numberOfRatings":"0","averageRating":"0","averageRatingStars":"0","smallImageUrl":"//mojo.generalmills.com/api/public/content/nKt0KW630EmSDr0yUuuEcg_webp_base.webp?v=204ff631\u0026t=67e847e026fb43aa8d6e3f5ef39a4ef7","mediumImageUrl":"//mojo.generalmills.com/api/public/content/nKt0KW630EmSDr0yUuuEcg_webp_base.webp?v=204ff631\u0026t=3653fe2f5ecd4a47a5a51c97e429947c"},{"contentId":"58581d3c-0d8f-4f21-9ebe-2eca0b0e3e63","contentType":"Recipe","title":"Rainbow Sprinkles Donut Pie","isFavorite":false,"linkUrl":"/recipes/rainbow-sprinkles-donut-pie/58581d3c-0d8f-4f21-9ebe-2eca0b0e3e63","numberOfRatings":"0","averageRating":"0","averageRatingStars":"0","smallImageUrl":"//mojo.generalmills.com/api/public/content/n2bIo2l8rEqFF1j8tMkYIQ_webp_base.webp?v=ecd27bf8\u0026t=67e847e026fb43aa8d6e3f5ef39a4ef7","mediumImageUrl":"//mojo.generalmills.com/api/public/content/n2bIo2l8rEqFF1j8tMkYIQ_webp_base.webp?v=ecd27bf8\u0026t=3653fe2f5ecd4a47a5a51c97e429947c"},{"contentId":"4fd86b0f-e968-443c-8f61-5880e2d793c3","contentType":"Recipe","title":"Easy Fried Beignets","isFavorite":false,"linkUrl":"/recipes/easy-fried-beignets/4fd86b0f-e968-443c-8f61-5880e2d793c3","numberOfRatings":"0","averageRating":"0","averageRatingStars":"0","smallImageUrl":"//mojo.generalmills.com/api/public/content/ZK2Pz0R1_0C-6_cCX_uItA_webp_base.webp?v=6c57b746\u0026t=67e847e026fb43aa8d6e3f5ef39a4ef7","mediumImageUrl":"//mojo.generalmills.com/api/public/content/ZK2Pz0R1_0C-6_cCX_uItA_webp_base.webp?v=6c57b746\u0026t=3653fe2f5ecd4a47a5a51c97e429947c"},{"contentId":"85c4fb59-4aa8-4e8a-832f-87bff263b23c","contentType":"Recipe","title":"Coffee and Donuts Milkshake","isFavorite":false,"linkUrl":"/recipes/coffee-and-donuts-milkshake/85c4fb59-4aa8-4e8a-832f-87bff263b23c","numberOfRatings":"0","averageRating":"0","averageRatingStars":"0","smallImageUrl":"//mojo.generalmills.com/api/public/content/wmuj8HgD9025xe_wtN8VVg_webp_base.webp?v=04a752b0\u0026t=67e847e026fb43aa8d6e3f5ef39a4ef7","mediumImageUrl":"//mojo.generalmills.com/api/public/content/wmuj8HgD9025xe_wtN8VVg_webp_base.webp?v=04a752b0\u0026t=3653fe2f5ecd4a47a5a51c97e429947c"},{"contentId":"f509381d-11e3-4ea4-bea9-08f798445adc","contentType":"Recipe","title":"Salted Caramel Crescent Donuts on a Stick","isFavorite":false,"linkUrl":"/recipes/salted-caramel-crescent-donuts-on-a-stick/f509381d-11e3-4ea4-bea9-08f798445adc","numberOfRatings":"0","averageRating":"0","averageRatingStars":"0","smallImageUrl":"//mojo.generalmills.com/api/public/content/9gMUHKtKRE2ELx-YV8AwhA_webp_base.webp?v=f8046a53\u0026t=67e847e026fb43aa8d6e3f5ef39a4ef7","mediumImageUrl":"//mojo.generalmills.com/api/public/content/9gMUHKtKRE2ELx-YV8AwhA_webp_base.webp?v=f8046a53\u0026t=3653fe2f5ecd4a47a5a51c97e429947c"},{"contentId":"e55d2e7f-4d58-40c9-b6b3-26a4c8673a0f","contentType":"Recipe","title":"Donut Tiramisu","isFavorite":false,"linkUrl":"/recipes/donut-tiramisu/e55d2e7f-4d58-40c9-b6b3-26a4c8673a0f","numberOfRatings":"0","averageRating":"0","averageRatingStars":"0","smallImageUrl":"//mojo.generalmills.com/api/public/content/e4-N0d7d50yIyg0J9opElw_webp_base.webp?v=c74b1d01\u0026t=67e847e026fb43aa8d6e3f5ef39a4ef7","mediumImageUrl":"//mojo.generalmills.com/api/public/content/e4-N0d7d50yIyg0J9opElw_webp_base.webp?v=c74b1d01\u0026t=3653fe2f5ecd4a47a5a51c97e429947c"}],"availableItems":[{"contentId":"6995da8c-c7f1-4f5f-a85c-be5b6c69db74","contentType":"Recipe","title":"Maple Bacon Donuts","isFavorite":false,"linkUrl":"/recipes/maple-bacon-donuts/6995da8c-c7f1-4f5f-a85c-be5b6c69db74","numberOfRatings":"0","averageRating":"0","averageRatingStars":"0","smallImageUrl":"//mojo.generalmills.com/api/public/content/nKt0KW630EmSDr0yUuuEcg_webp_base.webp?v=204ff631\u0026t=67e847e026fb43aa8d6e3f5ef39a4ef7","mediumImageUrl":"//mojo.generalmills.com/api/public/content/nKt0KW630EmSDr0yUuuEcg_webp_base.webp?v=204ff631\u0026t=3653fe2f5ecd4a47a5a51c97e429947c"},{"contentId":"58581d3c-0d8f-4f21-9ebe-2eca0b0e3e63","contentType":"Recipe","title":"Rainbow Sprinkles Donut Pie","isFavorite":false,"linkUrl":"/recipes/rainbow-sprinkles-donut-pie/58581d3c-0d8f-4f21-9ebe-2eca0b0e3e63","numberOfRatings":"0","averageRating":"0","averageRatingStars":"0","smallImageUrl":"//mojo.generalmills.com/api/public/content/n2bIo2l8rEqFF1j8tMkYIQ_webp_base.webp?v=ecd27bf8\u0026t=67e847e026fb43aa8d6e3f5ef39a4ef7","mediumImageUrl":"//mojo.generalmills.com/api/public/content/n2bIo2l8rEqFF1j8tMkYIQ_webp_base.webp?v=ecd27bf8\u0026t=3653fe2f5ecd4a47a5a51c97e429947c"},{"contentId":"4fd86b0f-e968-443c-8f61-5880e2d793c3","contentType":"Recipe","title":"Easy Fried Beignets","isFavorite":false,"linkUrl":"/recipes/easy-fried-beignets/4fd86b0f-e968-443c-8f61-5880e2d793c3","numberOfRatings":"0","averageRating":"0","averageRatingStars":"0","smallImageUrl":"//mojo.generalmills.com/api/public/content/ZK2Pz0R1_0C-6_cCX_uItA_webp_base.webp?v=6c57b746\u0026t=67e847e026fb43aa8d6e3f5ef39a4ef7","mediumImageUrl":"//mojo.generalmills.com/api/public/content/ZK2Pz0R1_0C-6_cCX_uItA_webp_base.webp?v=6c57b746\u0026t=3653fe2f5ecd4a47a5a51c97e429947c"},{"contentId":"85c4fb59-4aa8-4e8a-832f-87bff263b23c","contentType":"Recipe","title":"Coffee and Donuts Milkshake","isFavorite":false,"linkUrl":"/recipes/coffee-and-donuts-milkshake/85c4fb59-4aa8-4e8a-832f-87bff263b23c","numberOfRatings":"0","averageRating":"0","averageRatingStars":"0","smallImageUrl":"//mojo.generalmills.com/api/public/content/wmuj8HgD9025xe_wtN8VVg_webp_base.webp?v=04a752b0\u0026t=67e847e026fb43aa8d6e3f5ef39a4ef7","mediumImageUrl":"//mojo.generalmills.com/api/public/content/wmuj8HgD9025xe_wtN8VVg_webp_base.webp?v=04a752b0\u0026t=3653fe2f5ecd4a47a5a51c97e429947c"},{"contentId":"f509381d-11e3-4ea4-bea9-08f798445adc","contentType":"Recipe","title":"Salted Caramel Crescent Donuts on a Stick","isFavorite":false,"linkUrl":"/recipes/salted-caramel-crescent-donuts-on-a-stick/f509381d-11e3-4ea4-bea9-08f798445adc","numberOfRatings":"0","averageRating":"0","averageRatingStars":"0","smallImageUrl":"//mojo.generalmills.com/api/public/content/9gMUHKtKRE2ELx-YV8AwhA_webp_base.webp?v=f8046a53\u0026t=67e847e026fb43aa8d6e3f5ef39a4ef7","mediumImageUrl":"//mojo.generalmills.com/api/public/content/9gMUHKtKRE2ELx-YV8AwhA_webp_base.webp?v=f8046a53\u0026t=3653fe2f5ecd4a47a5a51c97e429947c"},{"contentId":"e55d2e7f-4d58-40c9-b6b3-26a4c8673a0f","contentType":"Recipe","title":"Donut Tiramisu","isFavorite":false,"linkUrl":"/recipes/donut-tiramisu/e55d2e7f-4d58-40c9-b6b3-26a4c8673a0f","numberOfRatings":"0","averageRating":"0","averageRatingStars":"0","smallImageUrl":"//mojo.generalmills.com/api/public/content/e4-N0d7d50yIyg0J9opElw_webp_base.webp?v=c74b1d01\u0026t=67e847e026fb43aa8d6e3f5ef39a4ef7","mediumImageUrl":"//mojo.generalmills.com/api/public/content/e4-N0d7d50yIyg0J9opElw_webp_base.webp?v=c74b1d01\u0026t=3653fe2f5ecd4a47a5a51c97e429947c"}]}};
var moduleName = 'relatedContent';
var isVueModule = true;
GeneralMills.PandoSites.RegisterControlInstance(moduleName, configuration, componentMetadata, isVueModule)
});
})();
© 2025 ®/TM General Mills All Rights Reserved
