Levy's Bagels
Girl vs Dough
Updated May 3, 2017
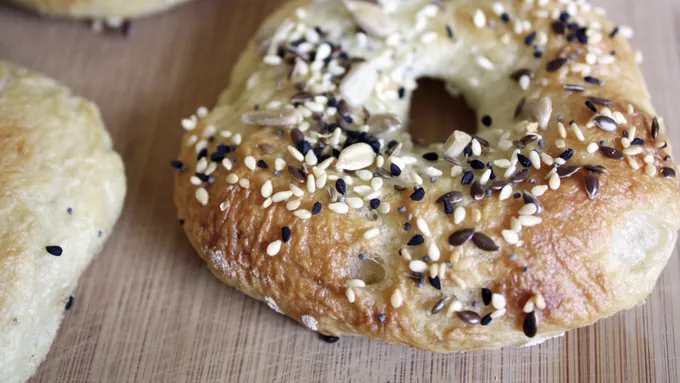
Delicious, wholesome bagels that are chewy and flavorful -- not like those cakey, oversized bagels from the grocery store. From The Bread Bible.
More About This Recipe
- I know what you're thinking. I thought it too, when I first made homemade bagels. "This recipe looks ridiculous/impossible!" I'll tell you what; It's neither. Then you might say, "I don't have this kind of time!" Well, that might be the case -- so you think - but that's not entirely valid, either. Any more excuses? No? Good. Let's make bagels. Believe me, when I first saw this recipe in The Bread Bible (which is literally a heavenly cookbook of all things bread, thanks to one Rose Levy Berenbaum) my jaw dropped. "This looks ridiculous!" I said. "This looks impossible!" I said. "I don't have this kind of time!" I also said. But, after researching and thoroughly studying this seemingly ridiculous/impossible/timely recipe, I realized that bagels aren't all that difficult to make. Once you decide to take the plunge, you'll realize it too. And trust me: You'll be thankful you did, as these are the tastiest bagels. OK, I have to admit that despite the ease of making these bagels, there is a bit of time and patience involved. Though it won't literally take you days to make these with constant attentiveness, it may take you the better part of an afternoon. But it's worth it, to have homemade bagels at your breakfast (or lunch, or dinner) table, all warm and chewy and delicious. These are no ordinary bagels -- they taste nothing like those cakey, flavorless varieties you'll find in tube-shaped bags at the grocery store. These bagels have a crust and a textural heaviness to them, and the savory flavor is incomparable. Topped with seeds (as I did), minced onions or just a hint of sea salt, after you delve into this bagel recipe, you'll soon be finding all sorts of time to make bagels from scratch.
Levy's Bagels
- Prep Time 7 hr 0 min
- Total 7 hr 30 min
- Servings 5
- Ingredients 17
Ingredients
- 2/3 teaspoon active dry yeast (for starter)
- 1 cup plus 2 tbsp lukewarm water (for starter)
- 1 1/2 cups bread flour (for starter)
- 1 1/2 tablespoon unsalted butter, optional (for flour mixture)
- 1 cup plus about 3 tbsp bread flour (for flour mixture)
- 2/3 teaspoon active dry yeast (for flour mixture)
- 1/2 tablespoon malt powder or barley malt syrup (for flour mixture)
- 1/2 tablespoon sugar (for flour mixture)
- 1/2 tablespoon salt (for flour mixture)
- 1/2 teaspoon black pepper (for flour mixture)
- 2 tablespoon molasses or 1/4 cup sugar (for water bath)
- 1 teaspoon baking soda (for water bath)
- 2 large egg whites (for glaze/toppings)
- 1 teaspoon cold water (for glaze/toppings)
- 3 to 4 tbsp poppy, sesame or caraway seeds
- Kosher or sea salt
- Minced onions sauteed in vegetable oil; and/or dried garlic chips or dehydrated onions softened in hot water
Instructions
-
Step1Make the starter: In a mixing bowl or the bowl of a stand mixer, place the yeast, water and flour. Whisk about 2 minutes, until very smooth; scrape down the sides. The sponge will be very thick. Cover the bowl with plastic wrap.
-
Step2Combine and add the ingredients for the flour mixture: In a medium bowl, whisk together 1 cup of the flour, the yeast, malt, sugar, salt and pepper. Sprinkle the mixture lightly over the sponge; do not stir. Cover with plastic wrap and let stand for 1 to 4 hours at room temperature, or, for the best flavor development, 1 hour at room temperature and then refrigerated overnight, or up to 24 hours. (During this time, the sponge will bubble through the flour mixture in places; this is fine.)
-
Step3Add the butter if using it (I didn’t) and all but 2 tablespoons of the remaining flour and mix with the dough hook, starting on low speed (#2 if using a KitchenAid), mix until all the flour is moistened, about 1 minute. Raise the speed to medium (#4 KitchenAid) and knead for 10 minutes if using high-gluten flour, 5 to 7 minutes if using bread flour, adding the remaining 2 tablespoons flour toward the end if the dough doesn’t pull away from the bowl. It should be very elastic and smooth and should jump back when pressed with a fingertip. Empty it onto the counter and knead in a little more flour if it is tacky (slightly sticky) to the touch. More flour will make a heavier, chewier bagel, which some prefer.
-
Step4Place the dough in a 2-quart dough-rising container or bowl, lightly greased with cooking spray or oil. Press the dough down and lightly spray or oil the top. Cover the container with a lid or plastic wrap. With a piece of tape, mark the side of the container at approximately where double the height of the dough would be. Allow the dough to rise, ideally at 75 to 80°F, or 1 to 2 hours until doubled (this part took about 3 hours for me, and even then it didn’t fully double… hmm). Deflate the dough by firmly pushing it down. Give it an envelope turn and set it back in the container. Oil the top of the dough, cover it, and refrigerate it for at least 4 hours, or overnight for the most flavor. (If you want to make the bagels later, at this point the dough can be wrapped and refrigerated for up to 2 days. Let the dough stand at room temperature for 30 minutes before shaping.)
-
Step5Set a sheet of the parchment or lightly floured towel on a countertop near the stovetop. (Alternatively, line the baking sheet(s) with parchment or floured towels and place the shaped bagels on them so you can move them easily when you are ready to boil them.) Transfer the dough to an unfloured counter. Cut the dough into five equal pieces. Allow the dough to rest for about 10 minutes. To develop slightly more chewiness, roll each piece of dough on an unfloured counter into a 12-inch-long rope. Make a ring, overlapping the ends by 2 inches and joining them by pressing down and rolling on the overlap until it is the same thickness as the rest of the dough ring. There will be a 1-inch hole in the center. This technique results in rounder, slightly higher bagels with smaller holes. Allow the bagels to rise for about 15 minutes or until they puff slightly.
-
Step6Preheat the oven to 500°F 30 minutes before baking. Have an oven shelf at the lowest level and place a baking stone or baking sheet on it before preheating.
-
Step7Bring a large pot (about 9-by-4-inches high) of water to a boil. Stir in the molasses or sugar and baking soda until dissolved. With a skimmer, transfer the bagels, one at a time, to the boiling water, without crowding them; cook them in batches of 2 to 3 at a time so that they can swim around without touching one another. If they are slightly underrisen, they may sink at first but will then rise to the surface. Boil for 30 seconds to 2 minutes on each side, gently flipping them over with the skimmer; the longer time will make a thicker crust. Remove the boiled bagels, shaking off excess water over the pot and set onto parchment or the unfloured towel to drain, then move them, using a pancake turner, to the prepared baking sheet(s) or peel, after just 30 seconds to 1 minute, so that they don’t stick. The bagels will look wrinkled at this stage. Don’t worry — their appearance vastly improves on baking.
-
Step8Whisk together the egg whites and cold water to break up the whites. Pass through a sieve into a bowl, and brush each bagel with the glaze. Do not let the glaze drip onto the baking sheet or peel, or it will glue them down. Brush with a second coat of glaze and, if desired, sprinkle any topping of your choice evenly over the bagels. (If you are using seeds, lift each bagel with a thin pancake turner or your hand, and, holding it over the pan with the seeds, sprinkle some more seeds on top. This way, you don’t have any seeds that would burn on the baking sheet.)
-
Step9If using baking sheets, place one sheet directly on the hot oven stone or hot baking sheet. If using a peel, slight the bagels onto the hot stone. Bake for 5 minutes. Lower the temperature to 450°F and bake for 20 minutes. Turn off the oven, without opening it and let the bagels remain for 5 minutes. Then open the oven door and leave the bagels in the oven for 5 more minutes.
-
Step10Transfer the bagels to a wire rack and cool completely.
Nutrition
No nutrition information available for this recipe
(function() {
document.addEventListener('DOMContentLoaded', function() {
var componentMetadata = JSON.parse('\x7b\x22componentName\x22\x3a\x22RelatedContent_86838426-dd26-481a-9735-69435bca607d\x22,\x22deferOptions\x22\x3a\x7b\x22deferComponent\x22\x3afalse,\x22deferType\x22\x3a\x22None\x22,\x22deferId\x22\x3a\x22r3cad1411cd744f7bb01caa8630d8f4c7\x22,\x22deferredContainerId\x22\x3a\x22\x2fmain\x2frdpRelatedContent1_NonDeferred\x22,\x22deferredContainerView\x22\x3anull\x7d,\x22viewName\x22\x3a\x22RelatedContent\x22\x7d');
var configuration = {"dataSourceId":"86838426-dd26-481a-9735-69435bca607d","isCurrentUserAnonymous":true,"isAnonymousUserWithFavorites":false,"relatedContentList":{"contentId":"4916dce7-0351-4bf0-8f1a-48837018699e","listSettings":{"pageSize":3,"startPage":1,"listType":1,"title":"Try These Next","useModalRegistration":false,"regAction":"","esrcCode":0,"favoriteButtonLabelFormat":"Add {0} to favorites","contentTypes":["Category"],"showImages":false,"imageSize":0,"showRatings":false,"allowFavoriting":false,"cssClassName":"relatedContentWithoutImages","favoriteButtonText":""},"items":[{"contentId":"c2763a40-34f9-4e58-ab97-84f24640e5ca","contentType":"Category","title":"Breakfast Pastries","isFavorite":false,"linkUrl":"/courses/breakfast-and-brunch/breakfast-pastry","numberOfRatings":"0","averageRating":"0","averageRatingStars":"0","smallImageUrl":"/-/media/GMI/Core-Sites/TBSP/Images/Articles/Images-for-Posts-PrePandoNext/2014/05/week3/2014-05-12-donuts-hero-680x384.jpg?W=276","mediumImageUrl":"/-/media/GMI/Core-Sites/TBSP/Images/Articles/Images-for-Posts-PrePandoNext/2014/05/week3/2014-05-12-donuts-hero-680x384.jpg?W=680"},{"contentId":"63d1116a-4543-43d5-841e-a3d490a1d726","contentType":"Category","title":"Breakfast \u0026 Brunch","isFavorite":false,"linkUrl":"/courses/breakfast-and-brunch","numberOfRatings":"0","averageRating":"0","averageRatingStars":"0","smallImageUrl":"/-/media/GMI/Core-Sites/TBSP/Images/recipe-hero/breakfast-brunch/bacon-and-egg-crescent-squares_hero.jpg?sc_lang=en?W=276","mediumImageUrl":"/-/media/GMI/Core-Sites/TBSP/Images/recipe-hero/breakfast-brunch/bacon-and-egg-crescent-squares_hero.jpg?sc_lang=en?W=680"},{"contentId":"8ea89f09-15ee-42c4-807a-19dbcd68b085","contentType":"Category","title":"Banana Breads","isFavorite":false,"linkUrl":"/courses/bread/quick-bread/banana-bread","numberOfRatings":"0","averageRating":"0","averageRatingStars":"0","smallImageUrl":"","mediumImageUrl":""}],"availableItems":[{"contentId":"c2763a40-34f9-4e58-ab97-84f24640e5ca","contentType":"Category","title":"Breakfast Pastries","isFavorite":false,"linkUrl":"/courses/breakfast-and-brunch/breakfast-pastry","numberOfRatings":"0","averageRating":"0","averageRatingStars":"0","smallImageUrl":"/-/media/GMI/Core-Sites/TBSP/Images/Articles/Images-for-Posts-PrePandoNext/2014/05/week3/2014-05-12-donuts-hero-680x384.jpg?W=276","mediumImageUrl":"/-/media/GMI/Core-Sites/TBSP/Images/Articles/Images-for-Posts-PrePandoNext/2014/05/week3/2014-05-12-donuts-hero-680x384.jpg?W=680"},{"contentId":"63d1116a-4543-43d5-841e-a3d490a1d726","contentType":"Category","title":"Breakfast \u0026 Brunch","isFavorite":false,"linkUrl":"/courses/breakfast-and-brunch","numberOfRatings":"0","averageRating":"0","averageRatingStars":"0","smallImageUrl":"/-/media/GMI/Core-Sites/TBSP/Images/recipe-hero/breakfast-brunch/bacon-and-egg-crescent-squares_hero.jpg?sc_lang=en?W=276","mediumImageUrl":"/-/media/GMI/Core-Sites/TBSP/Images/recipe-hero/breakfast-brunch/bacon-and-egg-crescent-squares_hero.jpg?sc_lang=en?W=680"},{"contentId":"8ea89f09-15ee-42c4-807a-19dbcd68b085","contentType":"Category","title":"Banana Breads","isFavorite":false,"linkUrl":"/courses/bread/quick-bread/banana-bread","numberOfRatings":"0","averageRating":"0","averageRatingStars":"0","smallImageUrl":"","mediumImageUrl":""}]}};
var moduleName = 'relatedContent';
var isVueModule = true;
GeneralMills.PandoSites.RegisterControlInstance(moduleName, configuration, componentMetadata, isVueModule)
});
})();
(function() {
document.addEventListener('DOMContentLoaded', function() {
var componentMetadata = JSON.parse('\x7b\x22componentName\x22\x3a\x22RelatedContent_9930dad2-817c-4363-b508-21f459b3c521\x22,\x22deferOptions\x22\x3a\x7b\x22deferComponent\x22\x3atrue,\x22deferType\x22\x3a\x22OnDemand\x22,\x22deferId\x22\x3a\x22rf34dc2f42f4543e2bb0202d5e2cce20a\x22,\x22deferredContainerId\x22\x3a\x22\x2fmain\x2frdpRelatedContent1\x22,\x22deferredContainerView\x22\x3a\x22RecipeDetailRedesign\x22\x7d,\x22viewName\x22\x3a\x22RelatedContent\x22\x7d');
var configuration = {"dataSourceId":"9930dad2-817c-4363-b508-21f459b3c521","isCurrentUserAnonymous":true,"isAnonymousUserWithFavorites":false,"relatedContentList":{"contentId":"4916dce7-0351-4bf0-8f1a-48837018699e","listSettings":{"pageSize":6,"startPage":1,"listType":1,"title":"","useModalRegistration":false,"regAction":"","esrcCode":0,"favoriteButtonLabelFormat":"Add {0} to favorites","contentTypes":[],"showImages":true,"imageSize":1,"showRatings":false,"allowFavoriting":true,"cssClassName":"","favoriteButtonText":"Save"},"items":[{"contentId":"6f634623-3792-469e-9ee4-b7467e6a7866","contentType":"Recipe","title":"Mini Cake Bagels","isFavorite":false,"linkUrl":"/recipes/mini-cake-bagels/6f634623-3792-469e-9ee4-b7467e6a7866","numberOfRatings":"0","averageRating":"0","averageRatingStars":"0","smallImageUrl":"//mojo.generalmills.com/api/public/content/Gl4uDAsgsEWdKhLivCJr5g_webp_base.webp?v=b827e768\u0026t=67e847e026fb43aa8d6e3f5ef39a4ef7","mediumImageUrl":"//mojo.generalmills.com/api/public/content/Gl4uDAsgsEWdKhLivCJr5g_webp_base.webp?v=b827e768\u0026t=3653fe2f5ecd4a47a5a51c97e429947c"},{"contentId":"62b03a3c-6986-4b38-9f18-9421c522258c","contentType":"Recipe","title":"Double Rainbow Bagels","isFavorite":false,"linkUrl":"/recipes/double-rainbow-bagels/62b03a3c-6986-4b38-9f18-9421c522258c","numberOfRatings":"0","averageRating":"0","averageRatingStars":"0","smallImageUrl":"//mojo.generalmills.com/api/public/content/AsX9P-05Yk6VLHni_Vmyag_webp_base.webp?v=8a6c4303\u0026t=67e847e026fb43aa8d6e3f5ef39a4ef7","mediumImageUrl":"//images-gmi-pmc.edge-generalmills.com/9e196e2d-beec-496c-8dab-42b2f3e3aa90.jpg"},{"contentId":"3795cf85-d96f-4276-a43f-b1787f46f61b","contentType":"Recipe","title":"Breakfast Bagel Salad with The Works Croutons","isFavorite":false,"linkUrl":"/recipes/breakfast-bagel-salad-with-the-works-croutons/3795cf85-d96f-4276-a43f-b1787f46f61b","numberOfRatings":"0","averageRating":"0","averageRatingStars":"0","smallImageUrl":"//mojo.generalmills.com/api/public/content/rLJsB-mfhUqtLd6zCjdPCw_webp_base.webp?v=22f628f0\u0026t=67e847e026fb43aa8d6e3f5ef39a4ef7","mediumImageUrl":"//mojo.generalmills.com/api/public/content/rLJsB-mfhUqtLd6zCjdPCw_webp_base.webp?v=22f628f0\u0026t=3653fe2f5ecd4a47a5a51c97e429947c"},{"contentId":"94eea00a-2f79-40a8-9c4b-1e0cf2d7b873","contentType":"Recipe","title":"Baked Egg Boats For Two","isFavorite":false,"linkUrl":"/recipes/baked-egg-boats-for-two/94eea00a-2f79-40a8-9c4b-1e0cf2d7b873","numberOfRatings":"0","averageRating":"0","averageRatingStars":"0","smallImageUrl":"//mojo.generalmills.com/api/public/content/Yn95jCsh-02iHCc4ai4o-w_webp_base.webp?v=18a46556\u0026t=67e847e026fb43aa8d6e3f5ef39a4ef7","mediumImageUrl":"//mojo.generalmills.com/api/public/content/Yn95jCsh-02iHCc4ai4o-w_webp_base.webp?v=18a46556\u0026t=3653fe2f5ecd4a47a5a51c97e429947c"},{"contentId":"da2c2f8b-02cf-46ca-9a41-5e13889b780d","contentType":"Recipe","title":"Sweet Raisin Bread","isFavorite":false,"linkUrl":"/recipes/sweet-raisin-bread/da2c2f8b-02cf-46ca-9a41-5e13889b780d","numberOfRatings":"0","averageRating":"0","averageRatingStars":"0","smallImageUrl":"//mojo.generalmills.com/api/public/content/t4b12Bxe2EeCvEVlc22Ifg_webp_base.webp?v=03e798ba\u0026t=67e847e026fb43aa8d6e3f5ef39a4ef7","mediumImageUrl":"//mojo.generalmills.com/api/public/content/t4b12Bxe2EeCvEVlc22Ifg_webp_base.webp?v=03e798ba\u0026t=3653fe2f5ecd4a47a5a51c97e429947c"},{"contentId":"4853a361-02cc-4f92-8187-3b85889b202b","contentType":"Recipe","title":"Rhubarb Drop Scones","isFavorite":false,"linkUrl":"/recipes/rhubarb-drop-scones/4853a361-02cc-4f92-8187-3b85889b202b","numberOfRatings":"0","averageRating":"0","averageRatingStars":"0","smallImageUrl":"//mojo.generalmills.com/api/public/content/kPcWyrAPT0eqcha2mkHUVQ_webp_base.webp?v=7a455966\u0026t=67e847e026fb43aa8d6e3f5ef39a4ef7","mediumImageUrl":"//mojo.generalmills.com/api/public/content/kPcWyrAPT0eqcha2mkHUVQ_webp_base.webp?v=7a455966\u0026t=3653fe2f5ecd4a47a5a51c97e429947c"}],"availableItems":[{"contentId":"6f634623-3792-469e-9ee4-b7467e6a7866","contentType":"Recipe","title":"Mini Cake Bagels","isFavorite":false,"linkUrl":"/recipes/mini-cake-bagels/6f634623-3792-469e-9ee4-b7467e6a7866","numberOfRatings":"0","averageRating":"0","averageRatingStars":"0","smallImageUrl":"//mojo.generalmills.com/api/public/content/Gl4uDAsgsEWdKhLivCJr5g_webp_base.webp?v=b827e768\u0026t=67e847e026fb43aa8d6e3f5ef39a4ef7","mediumImageUrl":"//mojo.generalmills.com/api/public/content/Gl4uDAsgsEWdKhLivCJr5g_webp_base.webp?v=b827e768\u0026t=3653fe2f5ecd4a47a5a51c97e429947c"},{"contentId":"62b03a3c-6986-4b38-9f18-9421c522258c","contentType":"Recipe","title":"Double Rainbow Bagels","isFavorite":false,"linkUrl":"/recipes/double-rainbow-bagels/62b03a3c-6986-4b38-9f18-9421c522258c","numberOfRatings":"0","averageRating":"0","averageRatingStars":"0","smallImageUrl":"//mojo.generalmills.com/api/public/content/AsX9P-05Yk6VLHni_Vmyag_webp_base.webp?v=8a6c4303\u0026t=67e847e026fb43aa8d6e3f5ef39a4ef7","mediumImageUrl":"//images-gmi-pmc.edge-generalmills.com/9e196e2d-beec-496c-8dab-42b2f3e3aa90.jpg"},{"contentId":"3795cf85-d96f-4276-a43f-b1787f46f61b","contentType":"Recipe","title":"Breakfast Bagel Salad with The Works Croutons","isFavorite":false,"linkUrl":"/recipes/breakfast-bagel-salad-with-the-works-croutons/3795cf85-d96f-4276-a43f-b1787f46f61b","numberOfRatings":"0","averageRating":"0","averageRatingStars":"0","smallImageUrl":"//mojo.generalmills.com/api/public/content/rLJsB-mfhUqtLd6zCjdPCw_webp_base.webp?v=22f628f0\u0026t=67e847e026fb43aa8d6e3f5ef39a4ef7","mediumImageUrl":"//mojo.generalmills.com/api/public/content/rLJsB-mfhUqtLd6zCjdPCw_webp_base.webp?v=22f628f0\u0026t=3653fe2f5ecd4a47a5a51c97e429947c"},{"contentId":"94eea00a-2f79-40a8-9c4b-1e0cf2d7b873","contentType":"Recipe","title":"Baked Egg Boats For Two","isFavorite":false,"linkUrl":"/recipes/baked-egg-boats-for-two/94eea00a-2f79-40a8-9c4b-1e0cf2d7b873","numberOfRatings":"0","averageRating":"0","averageRatingStars":"0","smallImageUrl":"//mojo.generalmills.com/api/public/content/Yn95jCsh-02iHCc4ai4o-w_webp_base.webp?v=18a46556\u0026t=67e847e026fb43aa8d6e3f5ef39a4ef7","mediumImageUrl":"//mojo.generalmills.com/api/public/content/Yn95jCsh-02iHCc4ai4o-w_webp_base.webp?v=18a46556\u0026t=3653fe2f5ecd4a47a5a51c97e429947c"},{"contentId":"da2c2f8b-02cf-46ca-9a41-5e13889b780d","contentType":"Recipe","title":"Sweet Raisin Bread","isFavorite":false,"linkUrl":"/recipes/sweet-raisin-bread/da2c2f8b-02cf-46ca-9a41-5e13889b780d","numberOfRatings":"0","averageRating":"0","averageRatingStars":"0","smallImageUrl":"//mojo.generalmills.com/api/public/content/t4b12Bxe2EeCvEVlc22Ifg_webp_base.webp?v=03e798ba\u0026t=67e847e026fb43aa8d6e3f5ef39a4ef7","mediumImageUrl":"//mojo.generalmills.com/api/public/content/t4b12Bxe2EeCvEVlc22Ifg_webp_base.webp?v=03e798ba\u0026t=3653fe2f5ecd4a47a5a51c97e429947c"},{"contentId":"4853a361-02cc-4f92-8187-3b85889b202b","contentType":"Recipe","title":"Rhubarb Drop Scones","isFavorite":false,"linkUrl":"/recipes/rhubarb-drop-scones/4853a361-02cc-4f92-8187-3b85889b202b","numberOfRatings":"0","averageRating":"0","averageRatingStars":"0","smallImageUrl":"//mojo.generalmills.com/api/public/content/kPcWyrAPT0eqcha2mkHUVQ_webp_base.webp?v=7a455966\u0026t=67e847e026fb43aa8d6e3f5ef39a4ef7","mediumImageUrl":"//mojo.generalmills.com/api/public/content/kPcWyrAPT0eqcha2mkHUVQ_webp_base.webp?v=7a455966\u0026t=3653fe2f5ecd4a47a5a51c97e429947c"}]}};
var moduleName = 'relatedContent';
var isVueModule = true;
GeneralMills.PandoSites.RegisterControlInstance(moduleName, configuration, componentMetadata, isVueModule)
});
})();
© 2025 ®/TM General Mills All Rights Reserved


