Pear Vanilla Crostata
Michelle Palm
Updated Apr 23, 2021
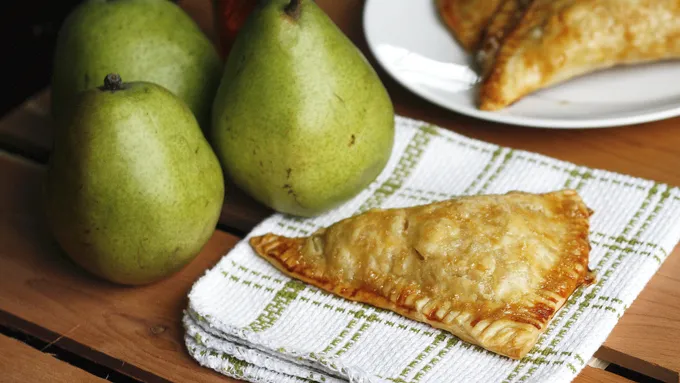
Pear and vanilla, together at long last, wrapped up in a Pillsbury™ pie crust!!
More About This Recipe
-
Apples and cinnamon. Lemon and meringue. Pear and vanilla—the new classic combo!
Sure, pear and vanilla is not quite a classic pair like the others. Not yet, anyway. The vanilla subtly enhances the delicate fruit, making it more complex without overpowering it. It’s a favorite of mine, particularly when made with a fresh vanilla bean.
And the crostata. Surely you can’t argue with a crostata—it’s such a go-to entertaining dessert, both for ease and sheer yumminess. Pie, without the fuss—now even easier with a ready-made Pillsbury™ Pie Crust!
I like to put together the Pear Vanilla Crostatas the morning of my dinner party, and just let them hang out in the fridge until dinner is underway. Then pop them in the oven just before dinner and take them out midway through, which gives them just enough time to set up before dessert.
To make the crostatas, first peel and chop your pears. Squeeze a little lemon juice over them so they don’t get too brown. Set aside.
Split a vanilla bean, spread it out and “smoodge” (yes, that’s a culinary term!) the paste out by dragging a knife or the back of spoon along the inside of the bean. It doesn’t look like a ton of vanilla, but it packs a bunch of flavor! (Two things: if you don’t go the vanilla bean route, a little vanilla extract will definitely do the trick. Another thing is that you can pop the used vanilla beans in a cup or so of sugar and after about a week, you’ll have vanilla sugar.)
Put the vanilla bean in the bowl containing the pears and mix it around with your hands until well incorporated. Mix the sugar and flour, sprinkle over the pears, and toss to combine.
Spread out the pie crusts on a Silpat-lined baking sheet. (You can also use parchment paper.)
Mound the filling in the center of the pie crusts, leaving about two inches around the edges. Fold the crust up, pleating where necessary.
And, besides the baking, that’s all there is to it! Hope you enjoy a little vanilla with your pears!
XO Michelle
More crostata recipes!
Peach and Raspberry Crostata
Fudge Crostata with Raspberry Sauce
Cinnamon-Apple Crostata
Country Rhubarb Crostata
Peach-Plum Crostata
Pear Vanilla Crostata
- Prep Time 15 min
- Total 50 min
- Servings 12
- Ingredients 6
Ingredients
- 1 box (14.1 oz) refrigerated Pillsbury™ Pie Crusts (2 Count)
- 8 pears peeled, cored and chopped
- 1 fresh lemon, cut in half
- 1 vanilla bean
- 1/2 cup granulated sugar
- 3 tbsp flour

Make With
Pillsbury Pie Crust
Instructions
-
Step1Preheat oven to 450°F.
-
Step2Remove pie crusts from refrigerator and allow to soften per instructions on box.
-
Step3In a large bowl, squeeze the lemons over the pears (this will stop the pears from browning).
-
Step4Strip the vanilla paste from the vanilla bean. Split the bean lengthwise, and run a knife or back of a spoon along the interior of the bean.
-
Step5Add the vanilla paste to the pears, and just smudge the mixture around with your hands until the vanilla is evenly distributed.
-
Step6Mix the flour and sugar, sprinkle over the pears and toss until combined.
-
Step7Spread the pie crusts out on baking sheets lined with either a silpat or parchment paper.
-
Step8Mound the pear mixture in the middle of each crust, leaving about 2 inches of space at the edges.
-
Step9Fold up the crust, and pleat the sides every so often.
-
Step10Bake for 30 to 40 minutes, until the pears are soft and the juices are bubbly, and the crust is golden brown.
-
Step11Serve warm or at room temperature, with or without vanilla ice cream!
Nutrition
No nutrition information available for this recipe
(function() {
document.addEventListener('DOMContentLoaded', function() {
var componentMetadata = JSON.parse('\x7b\x22componentName\x22\x3a\x22RelatedContent_86838426-dd26-481a-9735-69435bca607d\x22,\x22deferOptions\x22\x3a\x7b\x22deferComponent\x22\x3afalse,\x22deferType\x22\x3a\x22None\x22,\x22deferId\x22\x3a\x22r0644e3a871b04c97956e1bd15ae6d1af\x22,\x22deferredContainerId\x22\x3a\x22\x2fmain\x2frdpRelatedContent1_NonDeferred\x22,\x22deferredContainerView\x22\x3anull\x7d,\x22viewName\x22\x3a\x22RelatedContent\x22\x7d');
var configuration = {"dataSourceId":"86838426-dd26-481a-9735-69435bca607d","isCurrentUserAnonymous":true,"isAnonymousUserWithFavorites":false,"relatedContentList":{"contentId":"cfa58e7e-f0d9-47ad-8a7c-689682d57e36","listSettings":{"pageSize":3,"startPage":1,"listType":1,"title":"Try These Next","useModalRegistration":false,"regAction":"","esrcCode":0,"favoriteButtonLabelFormat":"Add {0} to favorites","contentTypes":["Category"],"showImages":false,"imageSize":0,"showRatings":false,"allowFavoriting":false,"cssClassName":"relatedContentWithoutImages","favoriteButtonText":""},"items":[{"contentId":"ed3e25cc-1231-411c-86bf-a8c90adbce2f","contentType":"Category","title":"No-Bake Cheesecake","isFavorite":false,"linkUrl":"/courses/dessert/cheesecake/no-bake-cheesecake","numberOfRatings":"0","averageRating":"0","averageRatingStars":"0","smallImageUrl":"","mediumImageUrl":""},{"contentId":"149d38aa-1950-42dc-a4aa-d1674dee3175","contentType":"Category","title":"Vanilla Cake","isFavorite":false,"linkUrl":"/courses/dessert/cake/vanilla-cake","numberOfRatings":"0","averageRating":"0","averageRatingStars":"0","smallImageUrl":"","mediumImageUrl":""},{"contentId":"af3d11fa-4863-4a04-8d77-fc3cbef60d97","contentType":"Category","title":"No-Bake Pie","isFavorite":false,"linkUrl":"/courses/dessert/pie/no-bake-pie","numberOfRatings":"0","averageRating":"0","averageRatingStars":"0","smallImageUrl":"","mediumImageUrl":""}],"availableItems":[{"contentId":"ed3e25cc-1231-411c-86bf-a8c90adbce2f","contentType":"Category","title":"No-Bake Cheesecake","isFavorite":false,"linkUrl":"/courses/dessert/cheesecake/no-bake-cheesecake","numberOfRatings":"0","averageRating":"0","averageRatingStars":"0","smallImageUrl":"","mediumImageUrl":""},{"contentId":"149d38aa-1950-42dc-a4aa-d1674dee3175","contentType":"Category","title":"Vanilla Cake","isFavorite":false,"linkUrl":"/courses/dessert/cake/vanilla-cake","numberOfRatings":"0","averageRating":"0","averageRatingStars":"0","smallImageUrl":"","mediumImageUrl":""},{"contentId":"af3d11fa-4863-4a04-8d77-fc3cbef60d97","contentType":"Category","title":"No-Bake Pie","isFavorite":false,"linkUrl":"/courses/dessert/pie/no-bake-pie","numberOfRatings":"0","averageRating":"0","averageRatingStars":"0","smallImageUrl":"","mediumImageUrl":""}]}};
var moduleName = 'relatedContent';
var isVueModule = true;
GeneralMills.PandoSites.RegisterControlInstance(moduleName, configuration, componentMetadata, isVueModule)
});
})();
(function() {
document.addEventListener('DOMContentLoaded', function() {
var componentMetadata = JSON.parse('\x7b\x22componentName\x22\x3a\x22RelatedContent_9930dad2-817c-4363-b508-21f459b3c521\x22,\x22deferOptions\x22\x3a\x7b\x22deferComponent\x22\x3atrue,\x22deferType\x22\x3a\x22OnDemand\x22,\x22deferId\x22\x3a\x22r9a7910c4a1ca4d3196197d82d8555507\x22,\x22deferredContainerId\x22\x3a\x22\x2fmain\x2frdpRelatedContent1\x22,\x22deferredContainerView\x22\x3a\x22RecipeDetailRedesign\x22\x7d,\x22viewName\x22\x3a\x22RelatedContent\x22\x7d');
var configuration = {"dataSourceId":"9930dad2-817c-4363-b508-21f459b3c521","isCurrentUserAnonymous":true,"isAnonymousUserWithFavorites":false,"relatedContentList":{"contentId":"cfa58e7e-f0d9-47ad-8a7c-689682d57e36","listSettings":{"pageSize":6,"startPage":1,"listType":1,"title":"","useModalRegistration":false,"regAction":"","esrcCode":0,"favoriteButtonLabelFormat":"Add {0} to favorites","contentTypes":[],"showImages":true,"imageSize":1,"showRatings":false,"allowFavoriting":true,"cssClassName":"","favoriteButtonText":"Save"},"items":[{"contentId":"faa964cb-b827-437d-8fc3-18799670f756","contentType":"Recipe","title":"French Pear Tart","isFavorite":false,"linkUrl":"/recipes/french-pear-tart/faa964cb-b827-437d-8fc3-18799670f756","numberOfRatings":"0","averageRating":"0","averageRatingStars":"0","smallImageUrl":"//mojo.generalmills.com/api/public/content/CidEfm9cNEW4NNFPlwfSXA_webp_base.webp?v=d27ef3ff\u0026t=67e847e026fb43aa8d6e3f5ef39a4ef7","mediumImageUrl":"//mojo.generalmills.com/api/public/content/CidEfm9cNEW4NNFPlwfSXA_webp_base.webp?v=d27ef3ff\u0026t=3653fe2f5ecd4a47a5a51c97e429947c"},{"contentId":"c33e0f47-a742-4f49-afc8-44a7640dae7c","contentType":"Recipe","title":"Caramel Pie Pears","isFavorite":false,"linkUrl":"/recipes/caramel-pie-pears/c33e0f47-a742-4f49-afc8-44a7640dae7c","numberOfRatings":"0","averageRating":"0","averageRatingStars":"0","smallImageUrl":"//mojo.generalmills.com/api/public/content/pK8_3w6E5k6m_aCv4J6yPQ_webp_base.webp?v=39bef91a\u0026t=67e847e026fb43aa8d6e3f5ef39a4ef7","mediumImageUrl":"//mojo.generalmills.com/api/public/content/pK8_3w6E5k6m_aCv4J6yPQ_webp_base.webp?v=39bef91a\u0026t=3653fe2f5ecd4a47a5a51c97e429947c"},{"contentId":"7b63e81d-a088-473a-8bca-74bb1641fc8d","contentType":"Recipe","title":"Powdered Sugar Icing","isFavorite":false,"linkUrl":"/recipes/powdered-sugar-icing/7b63e81d-a088-473a-8bca-74bb1641fc8d","numberOfRatings":"0","averageRating":"0","averageRatingStars":"0","smallImageUrl":"//mojo.generalmills.com/api/public/content/g6rfmC_cN0CXjuEo7C3pSA_webp_base.webp?v=b9311f10\u0026t=67e847e026fb43aa8d6e3f5ef39a4ef7","mediumImageUrl":"//mojo.generalmills.com/api/public/content/g6rfmC_cN0CXjuEo7C3pSA_webp_base.webp?v=b9311f10\u0026t=3653fe2f5ecd4a47a5a51c97e429947c"},{"contentId":"34421f51-7243-4ae1-a851-fa6d3b1d63ae","contentType":"Recipe","title":"Easy Cookie Icing","isFavorite":false,"linkUrl":"/recipes/easy-cookie-icing/34421f51-7243-4ae1-a851-fa6d3b1d63ae","numberOfRatings":"0","averageRating":"0","averageRatingStars":"0","smallImageUrl":"//mojo.generalmills.com/api/public/content/3vXgR8EKw0u8AtwUee9pvA_webp_base.webp?v=4a8ed414\u0026t=67e847e026fb43aa8d6e3f5ef39a4ef7","mediumImageUrl":"//mojo.generalmills.com/api/public/content/3vXgR8EKw0u8AtwUee9pvA_webp_base.webp?v=4a8ed414\u0026t=3653fe2f5ecd4a47a5a51c97e429947c"},{"contentId":"a9b6b59d-2616-43a7-850b-895504060e0b","contentType":"Recipe","title":"Easy Royal Icing","isFavorite":false,"linkUrl":"/recipes/easy-royal-icing/a9b6b59d-2616-43a7-850b-895504060e0b","numberOfRatings":"0","averageRating":"0","averageRatingStars":"0","smallImageUrl":"//mojo.generalmills.com/api/public/content/n8sHBfoFf0ujSIVXjgff_w_webp_base.webp?v=f0a57e60\u0026t=67e847e026fb43aa8d6e3f5ef39a4ef7","mediumImageUrl":"//mojo.generalmills.com/api/public/content/n8sHBfoFf0ujSIVXjgff_w_webp_base.webp?v=f0a57e60\u0026t=3653fe2f5ecd4a47a5a51c97e429947c"},{"contentId":"b3822e1b-fb15-4ff3-8120-6297985c0575","contentType":"Recipe","title":"Easy Honeyed Pear Turnovers","isFavorite":false,"linkUrl":"/recipes/easy-honeyed-pear-turnovers/b3822e1b-fb15-4ff3-8120-6297985c0575","numberOfRatings":"0","averageRating":"0","averageRatingStars":"0","smallImageUrl":"//mojo.generalmills.com/api/public/content/QBiwW_RDN0SP1tHF_F2iiw_webp_base.webp?v=1e4eb133\u0026t=67e847e026fb43aa8d6e3f5ef39a4ef7","mediumImageUrl":"//mojo.generalmills.com/api/public/content/QBiwW_RDN0SP1tHF_F2iiw_webp_base.webp?v=1e4eb133\u0026t=3653fe2f5ecd4a47a5a51c97e429947c"}],"availableItems":[{"contentId":"faa964cb-b827-437d-8fc3-18799670f756","contentType":"Recipe","title":"French Pear Tart","isFavorite":false,"linkUrl":"/recipes/french-pear-tart/faa964cb-b827-437d-8fc3-18799670f756","numberOfRatings":"0","averageRating":"0","averageRatingStars":"0","smallImageUrl":"//mojo.generalmills.com/api/public/content/CidEfm9cNEW4NNFPlwfSXA_webp_base.webp?v=d27ef3ff\u0026t=67e847e026fb43aa8d6e3f5ef39a4ef7","mediumImageUrl":"//mojo.generalmills.com/api/public/content/CidEfm9cNEW4NNFPlwfSXA_webp_base.webp?v=d27ef3ff\u0026t=3653fe2f5ecd4a47a5a51c97e429947c"},{"contentId":"c33e0f47-a742-4f49-afc8-44a7640dae7c","contentType":"Recipe","title":"Caramel Pie Pears","isFavorite":false,"linkUrl":"/recipes/caramel-pie-pears/c33e0f47-a742-4f49-afc8-44a7640dae7c","numberOfRatings":"0","averageRating":"0","averageRatingStars":"0","smallImageUrl":"//mojo.generalmills.com/api/public/content/pK8_3w6E5k6m_aCv4J6yPQ_webp_base.webp?v=39bef91a\u0026t=67e847e026fb43aa8d6e3f5ef39a4ef7","mediumImageUrl":"//mojo.generalmills.com/api/public/content/pK8_3w6E5k6m_aCv4J6yPQ_webp_base.webp?v=39bef91a\u0026t=3653fe2f5ecd4a47a5a51c97e429947c"},{"contentId":"7b63e81d-a088-473a-8bca-74bb1641fc8d","contentType":"Recipe","title":"Powdered Sugar Icing","isFavorite":false,"linkUrl":"/recipes/powdered-sugar-icing/7b63e81d-a088-473a-8bca-74bb1641fc8d","numberOfRatings":"0","averageRating":"0","averageRatingStars":"0","smallImageUrl":"//mojo.generalmills.com/api/public/content/g6rfmC_cN0CXjuEo7C3pSA_webp_base.webp?v=b9311f10\u0026t=67e847e026fb43aa8d6e3f5ef39a4ef7","mediumImageUrl":"//mojo.generalmills.com/api/public/content/g6rfmC_cN0CXjuEo7C3pSA_webp_base.webp?v=b9311f10\u0026t=3653fe2f5ecd4a47a5a51c97e429947c"},{"contentId":"34421f51-7243-4ae1-a851-fa6d3b1d63ae","contentType":"Recipe","title":"Easy Cookie Icing","isFavorite":false,"linkUrl":"/recipes/easy-cookie-icing/34421f51-7243-4ae1-a851-fa6d3b1d63ae","numberOfRatings":"0","averageRating":"0","averageRatingStars":"0","smallImageUrl":"//mojo.generalmills.com/api/public/content/3vXgR8EKw0u8AtwUee9pvA_webp_base.webp?v=4a8ed414\u0026t=67e847e026fb43aa8d6e3f5ef39a4ef7","mediumImageUrl":"//mojo.generalmills.com/api/public/content/3vXgR8EKw0u8AtwUee9pvA_webp_base.webp?v=4a8ed414\u0026t=3653fe2f5ecd4a47a5a51c97e429947c"},{"contentId":"a9b6b59d-2616-43a7-850b-895504060e0b","contentType":"Recipe","title":"Easy Royal Icing","isFavorite":false,"linkUrl":"/recipes/easy-royal-icing/a9b6b59d-2616-43a7-850b-895504060e0b","numberOfRatings":"0","averageRating":"0","averageRatingStars":"0","smallImageUrl":"//mojo.generalmills.com/api/public/content/n8sHBfoFf0ujSIVXjgff_w_webp_base.webp?v=f0a57e60\u0026t=67e847e026fb43aa8d6e3f5ef39a4ef7","mediumImageUrl":"//mojo.generalmills.com/api/public/content/n8sHBfoFf0ujSIVXjgff_w_webp_base.webp?v=f0a57e60\u0026t=3653fe2f5ecd4a47a5a51c97e429947c"},{"contentId":"b3822e1b-fb15-4ff3-8120-6297985c0575","contentType":"Recipe","title":"Easy Honeyed Pear Turnovers","isFavorite":false,"linkUrl":"/recipes/easy-honeyed-pear-turnovers/b3822e1b-fb15-4ff3-8120-6297985c0575","numberOfRatings":"0","averageRating":"0","averageRatingStars":"0","smallImageUrl":"//mojo.generalmills.com/api/public/content/QBiwW_RDN0SP1tHF_F2iiw_webp_base.webp?v=1e4eb133\u0026t=67e847e026fb43aa8d6e3f5ef39a4ef7","mediumImageUrl":"//mojo.generalmills.com/api/public/content/QBiwW_RDN0SP1tHF_F2iiw_webp_base.webp?v=1e4eb133\u0026t=3653fe2f5ecd4a47a5a51c97e429947c"}]}};
var moduleName = 'relatedContent';
var isVueModule = true;
GeneralMills.PandoSites.RegisterControlInstance(moduleName, configuration, componentMetadata, isVueModule)
});
})();
© 2025 ®/TM General Mills All Rights Reserved

